
Look at him up there, swinging around the front end of a Smart like it’ll just clip into place in a matter of moments. What you can’t see is his anguished expression, having removed the old, light green panel first – there is a man who knows exactly what the next few hours will entail.
Being able to change the colour of your Smart Fortwo was one of the two-seat city car’s USPs. Practically speaking it meant the plastic panels could be quickly and relatively cheaply replaced in the event of minor damage – think Parisian-grade parking scrapes.
More whimsically, Smart pitched it as a way of changing your car’s colour at will; you’d wake up one morning, wonder why you ever bought a grey one, and take it to the nearest Smart dealer to have them turn it yellow, or red, or perhaps ‘Numeric Blue’, which looked like the splash screen for a mathematics-themed gameshow.
In retrospect the idea sounds a bit like it’d appeal to the kind of folks who call themselves “random” – analogous to “zany” but more correctly described as “annoying” by everyone else – but you can see what Smart was going for.
The important part above was that you’d take your car to the dealer to have the work done. Partly because they’d presumably have ordered in the alternative panels for you, and partly, I’m beginning to suspect, because anyone taking the DIY approach would soon feel compelled to push their car into the nearest canal.
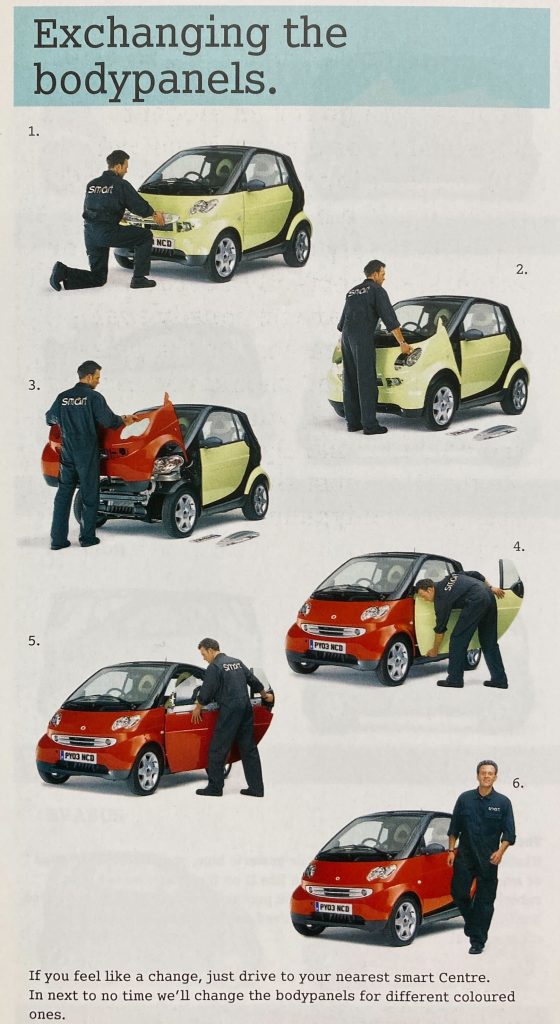
I suspect this because after spending many painful hours removing and reattaching a panel – just one of them – on my own Smart Fortwo, the Smart-branded gentleman in the official images is swapping panels around with what I now know to be unrealistic ease.
For a start, I should point out that my own car is a second-generation model, dubbed the ‘451’ in owner circles, rather than the mk1 ‘450’ shown in Smart’s press images. And it may well be that the process, much more heavily publicised with the earlier car, was easier on that original model.
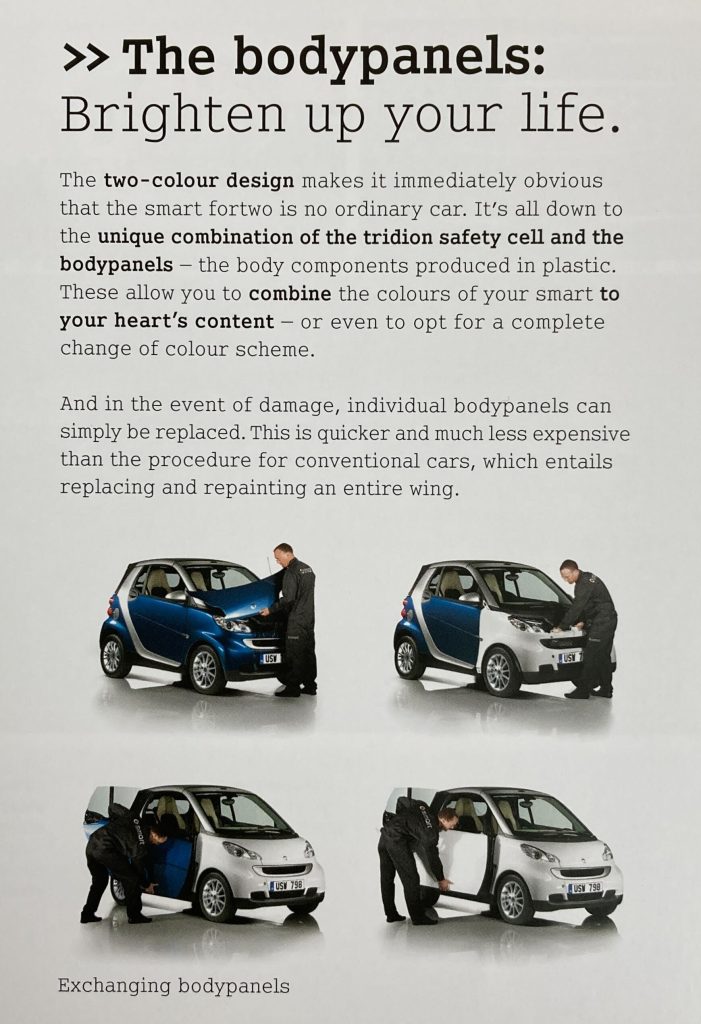
But it is shown in the brochure for the 451 too, so we have to assume it was still a selling point of the model. What is notable though is that in images of the 450 at the top, from Smart’s media website, nor the 451 brochure snippet here, are they photographed from the back of the car.
After spending an afternoon and evening first removing, then replacing the single rear panel – which includes the rear bumper and rear wings together – there may be a reason for this.
I did not go in blind; there’s a rather excellent video guide on YouTube that shows exactly what must be done to remove the panels, which Torx nuts should be unscrewed, which plastic clips must be removed, and the order in which you need to do it. The process is all very straightforward, in the same way tightrope-walking across Niagra Falls is merely a matter of keeping your balance.

The issues began with the unforeseen factors. Being plastic, rust was not a worry. But being plastic, a fixing for one of the Torx nuts holding on the panels had at some point broken, and now the nut was spinning freely in place.
Sadly, there was enough of the plastic captive nut left that it couldn’t be pulled through the mounting slot in the body. And given its location, hidden up in the sill, getting good purchase with vice grips or pliers to stop it spinning proved fruitless.
The only solution I could see was to destroy it, and given the poor access, this involved several hours wrenching and scraping away with the pliers, and several minutes brutally tugging away at the panel until the whole lot burst through the metal tab holding it to the body. You don’t get photos of this part, because I was in no mood to take any.
In theory, at this point, I should at least have been relieved with my progress. And I was, until I decided I should put everything back together again.
The instructional video (again, no faulting the method, if not its unrealistic absence of swearing) showed that removing the exterior panel of the hinge-down boot lid allowed more space and prevented damage, but attempting to feed the large, unwieldy bumper around the boot was still infuriating.
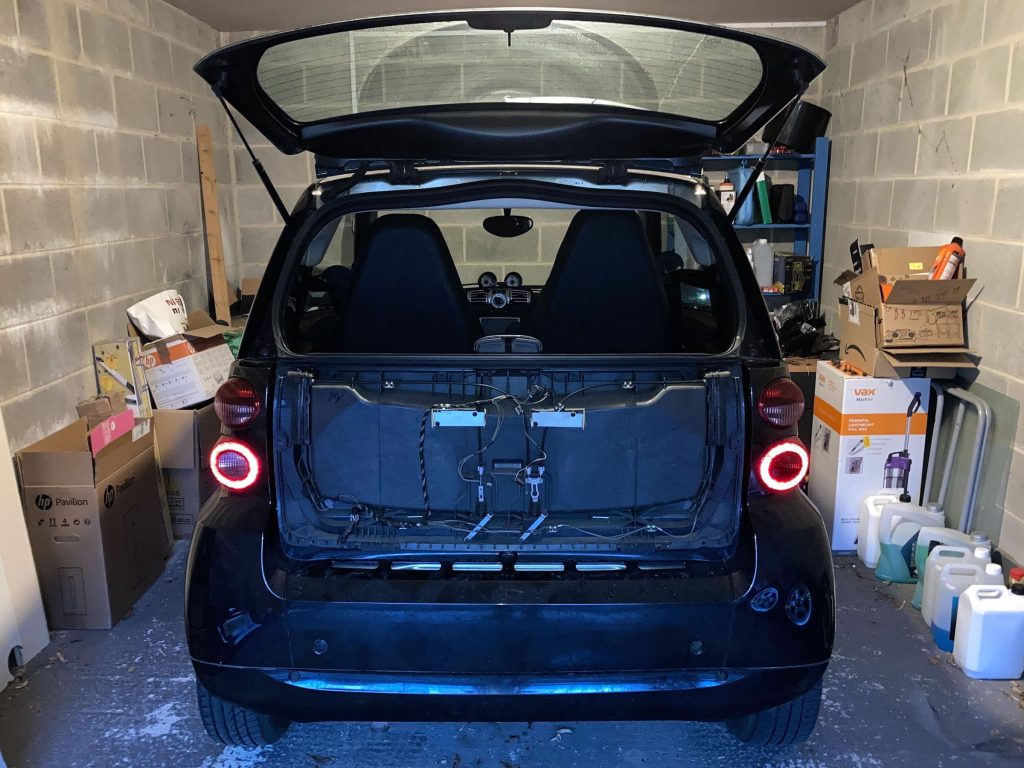

Given the Hambach factory that made my Smart is now turning out Ineos Grenadiers, and isn’t hundreds of acres of smouldering ash, I can only assume that factory workers put the entire tailgate on after the bumper, because doing it the other way around would be a guaranteed route to en masse corporate mutiny. With some more swearing, warping of the bumper, and some brutal effort, it eventually slotted vaguely into place, and its fixings could be re-attached.
That the process was nothing like as easy as I’d been led to believe was annoying on its own – broken fixings didn’t help, but if it took probably four hours to remove and reattach just the rear panel, I’d have to assume several more for doing the whole thing, if I wished to change the colour of the car myself.
But two more reasons made the whole process even more frustrating. The first is realising that, as far as I can tell, you would need to replicate at least part of this farcical process if you ever need to change a rear bulb on the model. The light units are (loosely) mounted to the rear of the panel, with no easy access to their electrics from inside the boot. As my faffing demonstrated, replacing them would be within the means of the decently-equipped DIYer, but the process is long-winded enough that your local garage would surely tell you to sod off.
The other irritation is that I didn’t even need to put myself through all this. I had removed the panels simply to get a better view of an oil leak – one that, as it turns out, seems to be no more complex than a porous sump. Visible by simply peering underneath the car, rear bumper in place.
This is not meant to be a dig at the complexity of working on modern cars (though the light thing is a bit daft), nor even the Smart specifically. Instead, take it as a warning that some jobs are never as easy as they seem. You’re only ever one broken fixing away from filling your garage with colourful Anglo-Saxon language.
Read more
I took my ridiculous car to the Nürburgring and you can too
Driving the modern Midget: Revisiting the Smart Roadster
Freeze Frame: Smart start as Mercedes shows city car duo


I don’t own a Smart, never have and don’t desire to in future, (nowhere to put my Mobility scooter).
But surely it’s far easier and quicker to simply get the car “wrapped”. Probably cheaper too.
Probably the facility of wrapping wasn’t so readily available 20 years ago but the idea of switching or replacing plastic panels was a great selling point. Alas the salesman had never attempted the task and, as ever, it is never as easy as it looks particularly for the average diy enthusiast. I speak from experience as I own a number of Smart cars and, yes, have swapped panels. However, I find the original Smart car to be a tremendous design concept and for town driving is unsurpassed.
Smart Roadster is much simpler, by the sounds of it. Lights front and back accessed without removing panels (apart from the headlight covers to reach some bulbs). Rear panel and both rear wings come off as one piece. Broken plastic fasteners, if they can’t be pulled out or pushed through, can be cut up with a rotary tool or half a junior hacksaw blade. Simples.
What no one tells you is that to replace a headlight bulb you have to remove the car’s complete front panel. Having said that the cabrio that I owned was one of my favourite cars of all time
Thanks for your comment Ian. You’re correct, though I actually found that very easy replacing the bulbs recently – removing the nose panel is barely more difficult than opening a bonnet, and accessing the back of the headlights is pretty easy, though might be a tight squeeze for larger hands. Probably took me no more than five minutes!