Jesse Crosse started as a motoring hack in 1982, was launch editor of Performance Car magazine and signed up an unheard writer called Jeremy Clarkson. He now writes about automotive technology, and spends his time restoring a pair of fast Fords, a 1968 GT390 Mustang fastback, and the same Ford Sierra Cosworth long-term test car he ran while editor of Performance Car. Here he shares tech tips for the have-a-go DIY car enthusiast.
Modern car engines are exclusively fitted with overhead camshafts to open and close exhaust and inlet valves in the cylinder head of an overhead valve engine, but in the past, an overhead cam (OHC) was mostly reserved for higher performance engines. The common alternative was the pushrod engine, with a single camshaft in the block opening and closing the valves above via pushrods and rockers – also known as tappets.

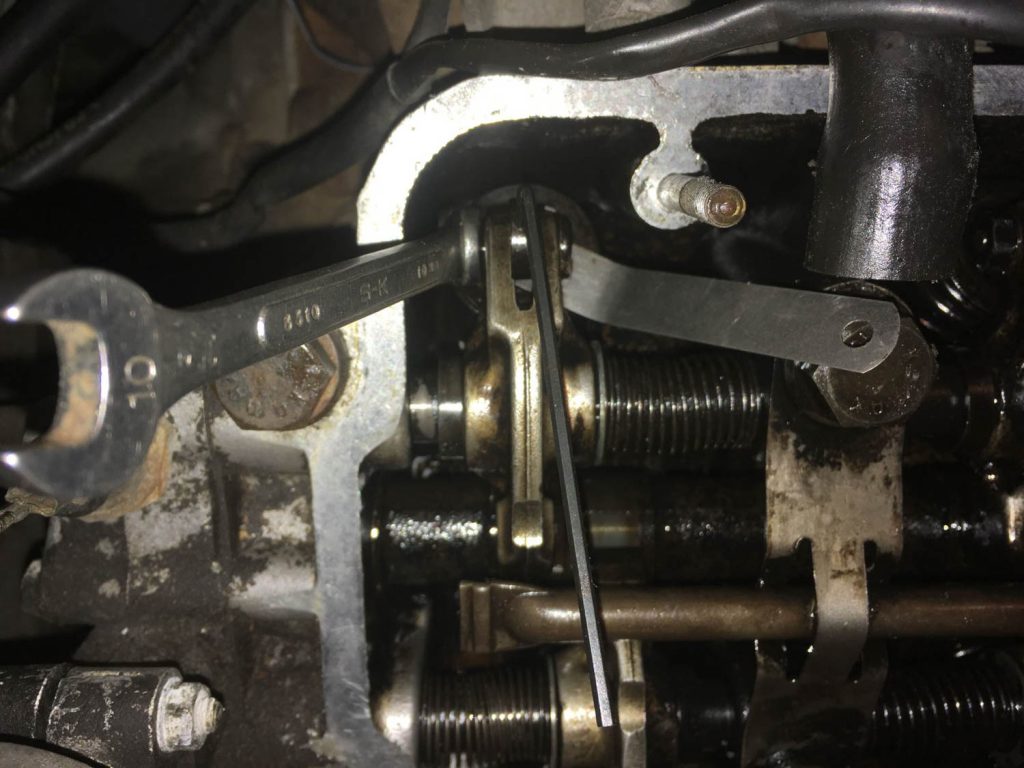
A regular task on the service schedule of pushrod engines is adjustment of clearances between the rocker and the head of the valve, but first, let’s get acquainted with how an OHC pushrod valvetrain works. The camshaft is driven from the crankshaft, usually by an internal chain in a pushrod engine, at half crankshaft speed. Cam followers are set into individual bores in the block above each cam lobe and slide up and down as the cam rotates. Pushrods sit on the cam followers, pass up through galleries in the block and cylinder head and engage into one side of each rocker. As the cam rotates, the cam followers move up and down and the movement is transmitted up through the pushrod to the rocker which pivots on the rocker shaft and opens the valves.
If there were no clearances between the rockers and the valves when the engine is cold, expansion of the valvetrain as the engine heats up would prevent the valves closing properly. Each time a cylinder fired the valve seats would burn, become pitted and leak, reducing power and progressively getting worse. Valve clearances often differ between inlet and exhaust valves because exhaust valves get hotter than the inlet valves, there’s more expansion and so as a rule, the clearances need to be bigger.
Now we know the theory behind the pushrod valvetrain and how it works, how are they adjusted? First of all, carefully remove the rocker cover to expose the rockers and valves. Normally, the male part of a small ball joint is screwed into the pushrod end of the rocker and held tight with a locknut. The female side of the ball joint is formed in the top of the pushrod. To adjust the valve clearance, slacken the locknut with a ring spanner and screw the ball in or out of the rocker a tiny amount, checking the clearance betwixt valve and rocker with feeler gauges. Once it’s correct, tighten the locknut and check again.
That’s not quite all though. It’s essential the clearance is adjusted when the cam follower is on the lowest point of its cam lobe and the valve is at that point fully closed. To do that on a four-cylinder, eight-valve engine, use the rule of nine. Counting from the front of the engine if number eight valve is fully open, subtract eight from nine and the answer is one, so adjust the clearance on valve number one. If number six is closed, then adjust number three and so on.
Valves can be progressively closed for adjusting their rule of nine counterpart by removing the spark plugs so there’s no compression, engaging a middle gear and rocking the car back and forth. Alternatively, use a socket and long socket wrench on the crankshaft pulley if there’s room. Rotating the engine 180° after each adjustment will fully close another valve, but not in sequence (because of the firing order) so keep a track of which valves you have adjusted. To keep track more easily, an alternative is to keep turning the engine further until they do close in the sequence you want. For example, closing eight, seven and six to adjust one, two, three and so on until all the clearances are set. If the inlet and exhaust clearances are different, you can tell which which is which easily enough from the position of the inlet and exhaust manifold stubs bolted to the head adjacent to each valve.
Avoid over-tightening the locknuts on the rockers and be sure to use a ring spanner on them rather than open-ended, otherwise rounding flats on the nuts is too easy given that they’re covered in oil and slippery. Don’t be tempted to start the engine with the rocker cover off, engine oil is pumped into the rocker shaft to lubricate the rockers and it will be flung everywhere. Replace the rocker cover, with a new gasket if necessary and the engine is ready to go.
One tip here; if the rocker cover is the pressed steel type, like a BMC or British Leyland A-Series, or Ford Kent engine, they will have thick cork gaskets. Avoid over-tightening the screws (for example, two on the A-Series and four on the Kent) as that will distort the cover and it will leak – a common mistake. Remember, valve clearances will reduce with time as valves bed in, while a “tappety” racket is a sure sign some of the clearances have opened up.
And of course, if you’ve not attempted any of this ever before, ask someone with experience for help. You can bet a fellow petrolhead will be happy to spend an afternoon taking you through each step.
Read more
Socket Set: Maintaining your car’s ignition system
Socket Set: How to service and adjust drum brakes
How spark plugs work and what they can tell you about your engine